FIESTA 25
Building instruction
Exploded drawing
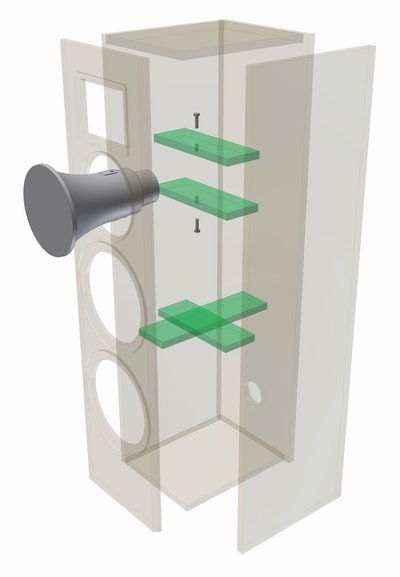
Assembly
The cabinet sections, cut from 19 mm chipboard or medium density fibreboard (MDF) board are butt jointed and glued. The chamfers on the baffle can be made with a jigsaw or circular saw set to 45° or added later using an orbital sander. The openings are then milled out and cut out.
The crossover can be attached to the rear wall behind the baffle cut-out for the lower woofer.
As the exploded views show, the mid-range horn is screwed firmly between the two upper reinforcing struts. These have to be very carefully shaped to ensure the horn is firmly held in exactly the right place. In particular, the minimum spacing of 114 mm must be observed.
Converting the mid-range horn
The standard DK 8 P horn is supplied as a 100-V version. It can, however, be easily converted to an 8-ohm version by removing the 100 V transformer. To do so, remove the mounting bracket and the rear cap (3 small Phillips screws). The magnet arrangement may be stuck in the cap. If so, ease it out carefully. Disconnect the two crimped connectors - but note which terminal the red wire was attached to (+), so that it is reconnected correctly later. As a rule, the minus terminal is marked with a black line on the side of the magnet. Next, remove the entire contents of the cap (transformer, circuit board and cables). These parts are no longer required. The wire from the crossover is fed into the cap and soldered onto the terminals on the magnet arrangement (check polarity). The openings in the cap do not need to be sealed (this is only necessary for outdoor use). The two square nuts in the horn (under the rubber seal) are removed and replaced with the two M8 nuts supplied. It makes sense to fix them in place with hot-melt glue to prevent them turning when they are tightened up. Next, replace the rubber sealing ring and insert the magnetarrangement in the horn. Ensure the lug on the opening in the mounting plate of the magnet arrangement is positioned exactly in the centre of the horn groove. Finally, refit the cap and screw it in place.
If you intend to conceal the opening of the horn using loudspeaker fabric, tension the fabric over the opening before fitting and hold it in place on the reverse of the horn housing using sticky tape.
Inner damping
Distribute all the matting evenly throughout the cabinet.
Cabinet parts list for 1 box
Sketch
Crossover
Press
"The idea of incorporating lots of surface area and masses of volume in a single speaker at an affordable price has been put into practice once again in a thoroughly consistent manner, even if it meant raising the overall standard of the system a notch or two. (...) This loudspeaker can easily deal with even very high output levels, punches out crisp bass, produces brilliantly clear treble and shows more than enough dynamism across all frequency ranges. (...) Vocals and percussion come over powerfully but always pleasantly and well-balanced. (...) Bubbling over with contrast, with a carefully measured shot of directivity, solid, clear bass and a highly satisfying overall sound quality even at realistic volumes, this speaker generates a real live-on-stage feeling. (...)
(...) The speaker combines the pleasure of high volumes with a surprisingly balanced overall quality and applicability, even with highly demanding recordings - it is, as it were, a fun speaker with excellent living-room manners."